Replacement
Note: The 325C, M325C MH, and 330C series do not have a governor actuator.
|
|
|
|
|
|
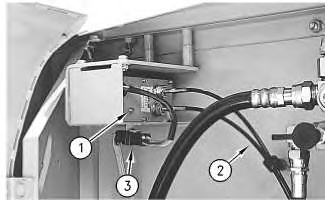
| Illustration 1 | g00778226 |
|
Governor actuator for 312C (1) Governor actuator (2) Governor cables (3) Connector for governor actuator |
|
|
|
|
|
|
|
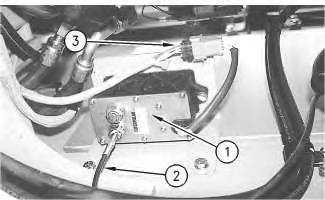
| Illustration 2 | g00778227 |
|
Governor actuator for 315C (1) Governor actuator (2) Accelerator cable (3) Connector for governor actuator |
|
|
|
|
|
|
|
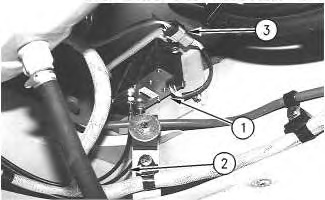
| Illustration 3 | g00778702 |
|
Governor actuator for 319C and 320C series (1) Governor actuator (2) Accelerator cable (3) Connector for governor actuator |
|
|
|
|
|
|
|
| Illustration 4 | g00991217 |
|
Governor Actuator for 321C (1) Governor actuator (2) Governor Cables (3) Connector for governor actuator |
|
|
|
|
|
|
|
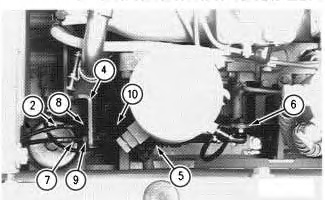
| Illustration 5 | g00778712 |
|
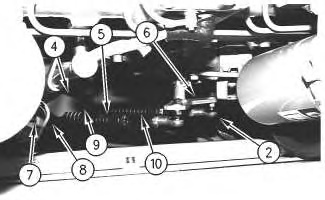
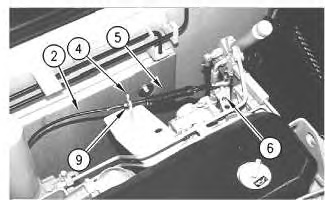
312C (2) Accelerator Cables (4) Support (5) Bellows (6) Lever (7) Decelerator cable (8) Nut (9) Nut (10) Bellows |
|
|
|
|
|
|
|
| Illustration 6 | g00778707 |
|
319C and 320C series (2) Accelerator Cables (4) Support (5) Bellows (6) Lever (7) Decelerator cable (8) Nut (9) Nut (10) Bellows |
|
|
|
|
|
|
|
| Illustration 7 | g00778717 |
|
322C Series I (2) Accelerator Cables (4) Support (5) Bellows (6) Lever (7) Decelerator cable (8) Nut (9) Nut (10) Bellows |
|
|
|
|
|
|
|
| Illustration 8 | g00989395 |
|
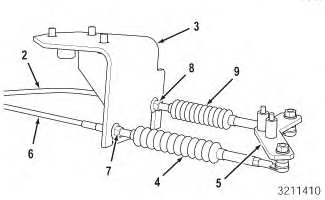
321C (2) Accelerator cable (3) Support (4) Bellows (5) Lever (6) Decelerator cable (7) Nut (8) Nut (9) Bellows |
|
Replacement For Machines Only With Accelerator Cable
- Install the actuator.
- Insert the joint of the accelerator cable through the hole in the lever. Install the nut in order to hold the cable in position.
- Turn the nut and the locknut of the accelerator cable in the counterclockwise direction until the nuts are separated.
- Turn the lever by hand in the counterclockwise direction to the position of high idle.
- Insert the other threaded portion of the accelerator cable into the notch of the support.
- Secure the screw cap and the boot so that the screw cap and the boot will not turn. Then turn the nut until the governor lever touches the high idle stop.
- Tighten the nut for two turns more.
- Tighten the locknut (27 ± 3 N·m (20 ± 2 lb ft)) against the support. Ensure that the nut remains in position while the locknut is tightened against the support.
- (If applicable) Reinstall the two clamps to the accelerator cable. Do not allow the cable to twist.
Note: Ensure that the governor lever is in contact with the high idle stop. Also, ensure that the nut is correctly tightened in order to ensure that the accelerator cable has the correct tension. The setting of the engine speed or an overload condition of the governor actuator could result if the cable is not tightened correctly.
Note: The minimum allowable bending radius for the cable assembly is 150 mm (6 inch).
Replacement For Machines With Accelerator Cable and Decelerator Cable
- Repeat step 1 through step 9 in “For Machines Only With Accelerator Cable”.
- Insert the joint of the decelerator cable through the hole in the lever. Install the nut in order to hold the cable in position.
- Loosen the nut and the locknut on decelerator cable.
- Insert the other threaded portion of the accelerator cable into the notch of the support.
- Tighten the nut until the sag in the bellows is no longer present. Loosen the nut by five turns.
Note: The minimum allowable bending radius for the cable assembly is 150 mm (6 inch).
Adjustment
- Loosen the nut and the locknut of the accelerator cable. The nuts should be separated as far as possible.
- Install the accelerator cable and the decelerator cable to the lever.
- Insert the threaded section of the accelerator cable into the support.
- Turn the lever clockwise toward the engine until the lever hits the stop for the high idle.
- Tighten the nut until the sag in the bellows is no longer present. The nut should be tightened two additional turns.
- Secure the accelerator cable to the support by tightening the locknut.
- Insert the threaded section of the decelerator cable into the notch of the support.
- Tighten the nut until the sag in the bellows is no longer present. Loosen the nut by two turns.
- Secure the decelerator cable to the support with the locknut. Then, tighten the locknut against the nut. Ensure that the nut does not turn as the locknut is tightened.
Calibration
Note: For more information, see the topic Testing And Adjusting, “Governor Actuator – Calibrate”.
- Start the engine. Perform the calibration procedure for the governor actuator.
- After the calibration procedure has been performed correctly, the error log is cleared.
Note: For more information, see Testing And Adjusting, “Logged Error Mode”.
