| Required Tools | ||
| Part Number | Description | Qty |
| 9U-7400 | Multitach Tool Group | 1 |
| Cooling fan speeds | ||
| Maximum Speed | Standard and Low Noise | 1250 ± 30 rpm |
| High Ambient | 1360 ± 30 rpm | |
| Minimum Speed | Standard and Low Noise | 880 ± 30 rpm |
| High Ambient | 900 ± 30 rpm | |
- Position the machine on level ground.
- Stop the engine.
- Install 9U-7400 Multitach II Group on the cooling fan.
- Start the engine.
- Place the machine controls at the following settings: engine speed dial 10 and AEC switch OFF. Refer to Testing and Adjusting, “Engine Performance – Test (Engine Speed)” for engine rpm settings.
- Start Service Mode and bring up “CALIBRATIONS” mode. Bring up “FAN SPEED” mode. “FAN SPEED” mode is within “CALIBRATIONS” mode.
- Press menu key (J) .
- Press right key (F) in order to highlight “SERVICE” menu option.
Note: If more than 30 seconds pass between pushing the keys on the keypad, the menu mode will be cancelled and the previous display will be restored to message display (A) .
- After the “SERVICE” option is highlighted, press OK key (I) .
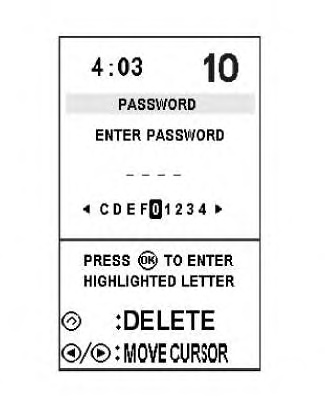
- After Ok key (I) is pressed, the screen in Illustration 2 will be displayed. The password for the service menu is “FFF2”. The keys for direction are used to input the password. Press left key (D) or right key (F) in order to change the position of the flashing character. Press OK key (I) in order to enter the highlighted character.
Illustration 2 g01148206 - After entering the last letter of the password, the monitor will continue with the “SERVICE” screen.
- Repeatedly press down key (E) in order to highlight the “CALIBRATIONS” line on the display.
- After the “CALIBRATIONS” line is highlighted, press OK key (I) .
- Once the “CALIBRATIONS” screen is displayed, press down key (E) in order to highlight the “FAN SPEED” line on the display.
- After the “FAN SPEED” line is highlighted, press OK key (I) .
Note: When you press the “OK” key (I), the monitor will prompt you to set the tachometer. Press OK key (I) in order to proceed to validate the minimum and maximum cooling fan speeds.
|
|
|
|
|
|
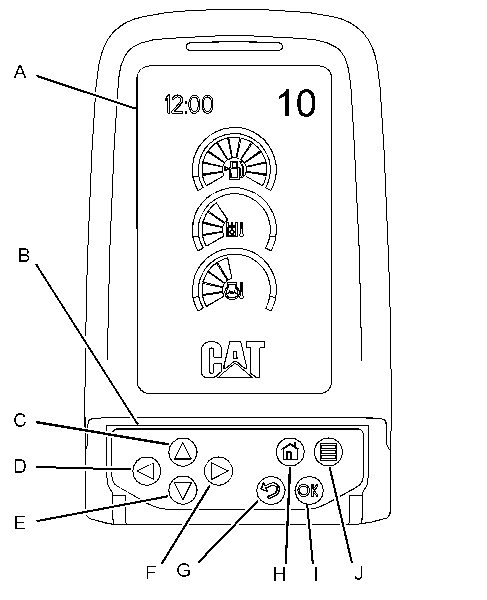
| Illustration 1 | g01321378 |
|
(A) Display (B) Keypad (C) Up key (D) Left key (E) Down key (F) Right key (G) Cancel key (H) home key (I) OK key (J) Menu key |
|
- A set of blue numbers will appear on monitor display (A). These numbers represent the minimum speed of the cooling fan in revolutions per minute (rpm). Observe the rpm reading of the tachometer. Refer to Table 2 for the proper rpm setting of the cooling fan at minimum speed.
- The speed adjustment of the cooling fan is controlled by left key (D) and right key (F). Press left key (D) in order to decrease the speed setting of the cooling fan and press right key (F) in order to increase the speed setting of the cooling fan.
- Once the proper setting of the minimum speed is displayed on the tachometer, press OK key (I) in order to proceed to validate the maximum cooling fan speed.
- Observe the rpm reading of the tachometer. Refer to Table 2 for the proper rpm setting of the cooling fan at maximum speed.
- For adjustment of the rpm setting of the cooling fan, press left key (D) in order to decrease the speed of the cooling fan, and press right key (F) in order to increase the speed of the cooling fan.
- Once the proper setting of the maximum speed is displayed on the tachometer, press OK key (I). The validation for the fan speed will be complete.
ReferenceFor more information on the validation of the cooling fan speed, refer to Systems Operation, “Calibration Mode”.